• My Account
  • Lost Password
  • About
  • Wholesale
  • Store Locator
  • Classes
  • Events
  • OOPSIE

Hands On Design

Needlework and Cross Stitch Designs by Cathy Habermann

  • Shop
  • Tutorials
  • Floss Tube
  • Blog
  • Contact
  • 0 items$0.00

SECRET SANTA: Finishing Template & Holly Bead Tutorial

February 25, 2020 By Cathy Habermann 11 Comments

Secret Santa – Finishing Template

Thank you for stitching this somewhat silly, a touch of sparkly, with a dash of secret… series!

By now you know the big secret (you get a portion of the 9th Santa on each of the 8 releases!) & are ready to finish!

I’ve provided a template which is the exact size that was used in the pictured finishes. You just need to grab some matboard, cardboard, batting, ribbon & all of those extra little bits to fully-finish your series!

Please follow my other Flat-Finishing tutorials for guidance on setting up your cut boards, lacing & stitching front to back. Print out this page & adjust as necessary so that the dimensions of the template measure what it should be.

I chose to use ribbon for a hanger & add a secondary bow—it is just put in place with a coordinating ball head pin.

You will need to cut 18 pattern pieces in all to complete all 9 ornaments. I would trace this onto a piece of cardboard & cut to use as a template. This will make your tracing more consistent.

Print template here.


Holly Beads

The ladies at Just Another Button Company designed a great new bead to coordinate with my series. Be sure to order them through your local or online shop. They are also available at www.justanotherbuttoncompany.com—10474.G—I’ve provided a few photos to show you how they are attached.

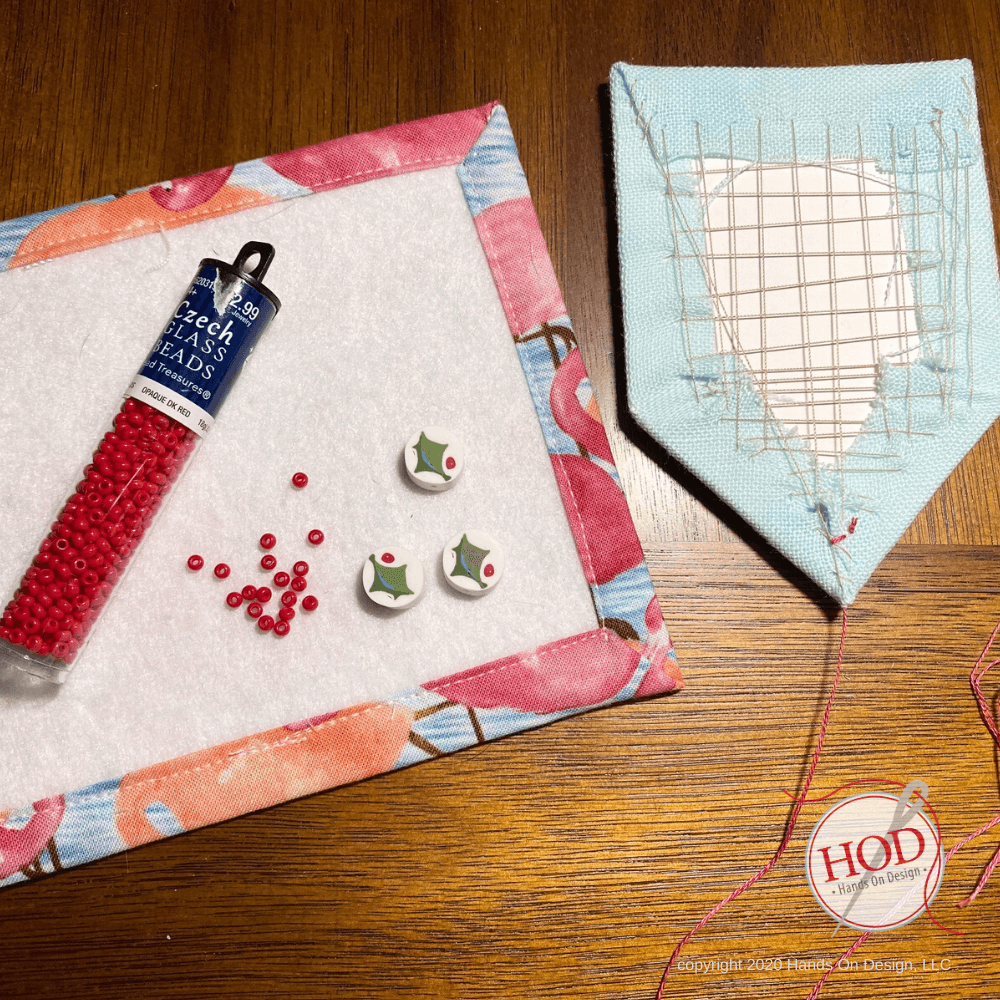
Grab some small red seed beads – I had these red beads in my stash from a former craft shop purchase.

Anchor 2 strands of coordinating red thread (I used the red that was in the series) on the inside of the laced stitching with a knot. Push the needle & thread through the linen so that the point of the needle comes out at the bottom tip of the linen.

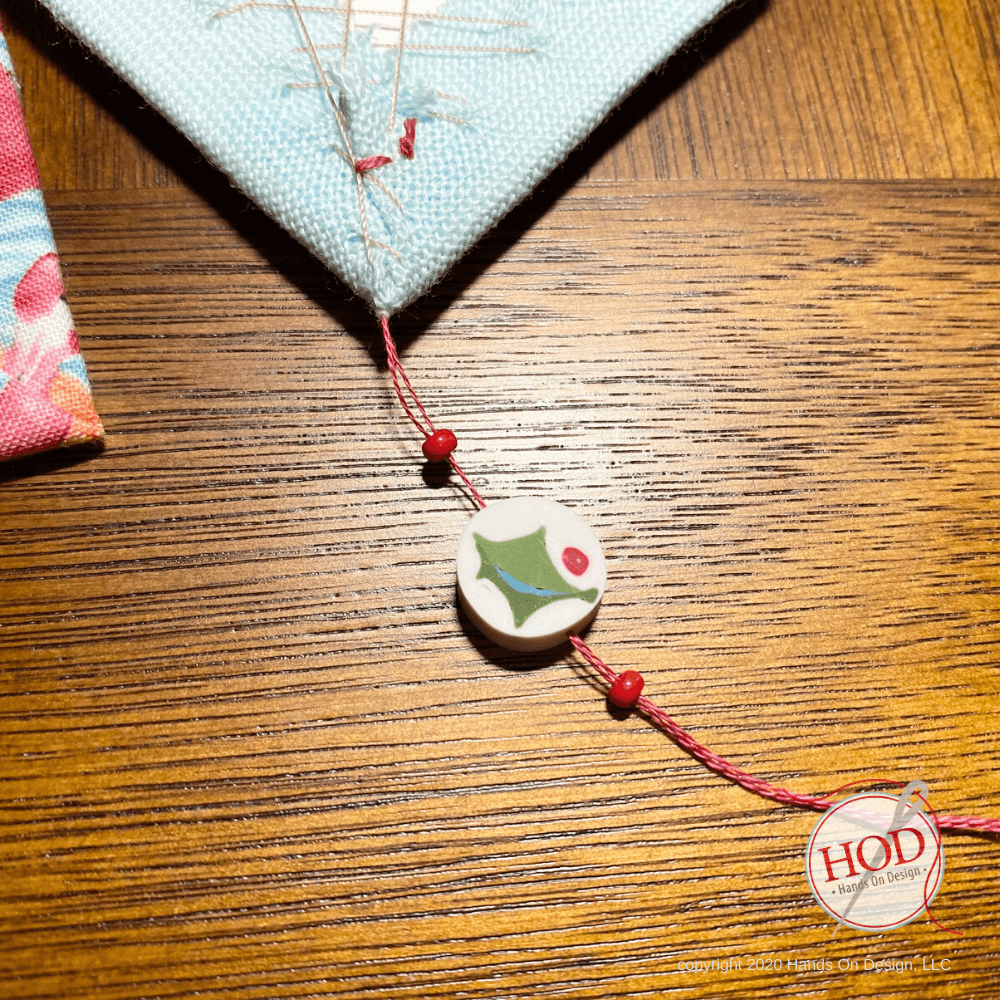
Thread the needle through a seed bead, next through the Holly Bead, & finally through another seed bead.

Snug the beads up to the point of the ornament.

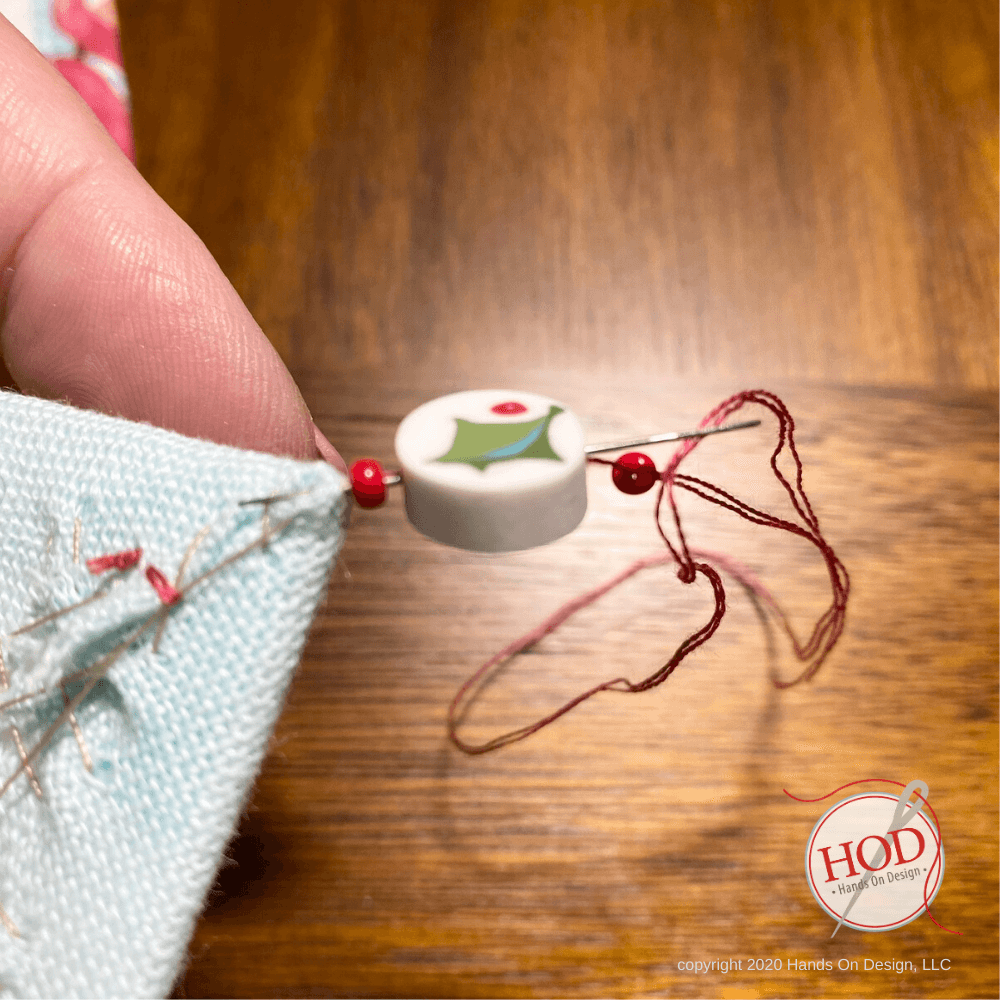
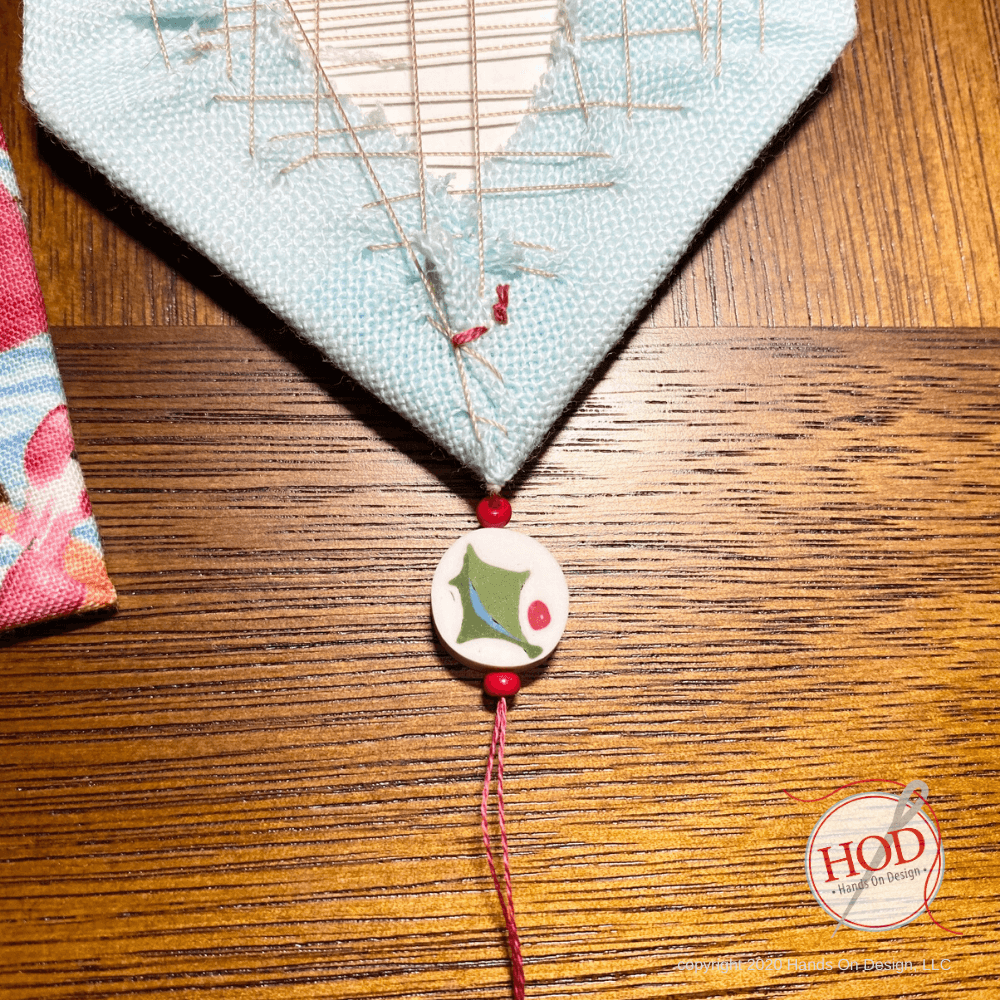
Thread the needle back through the Holly Bead and the 1st seed bead. I pushed the threaded needle through the linen close to where you previously came through in the 1st step.

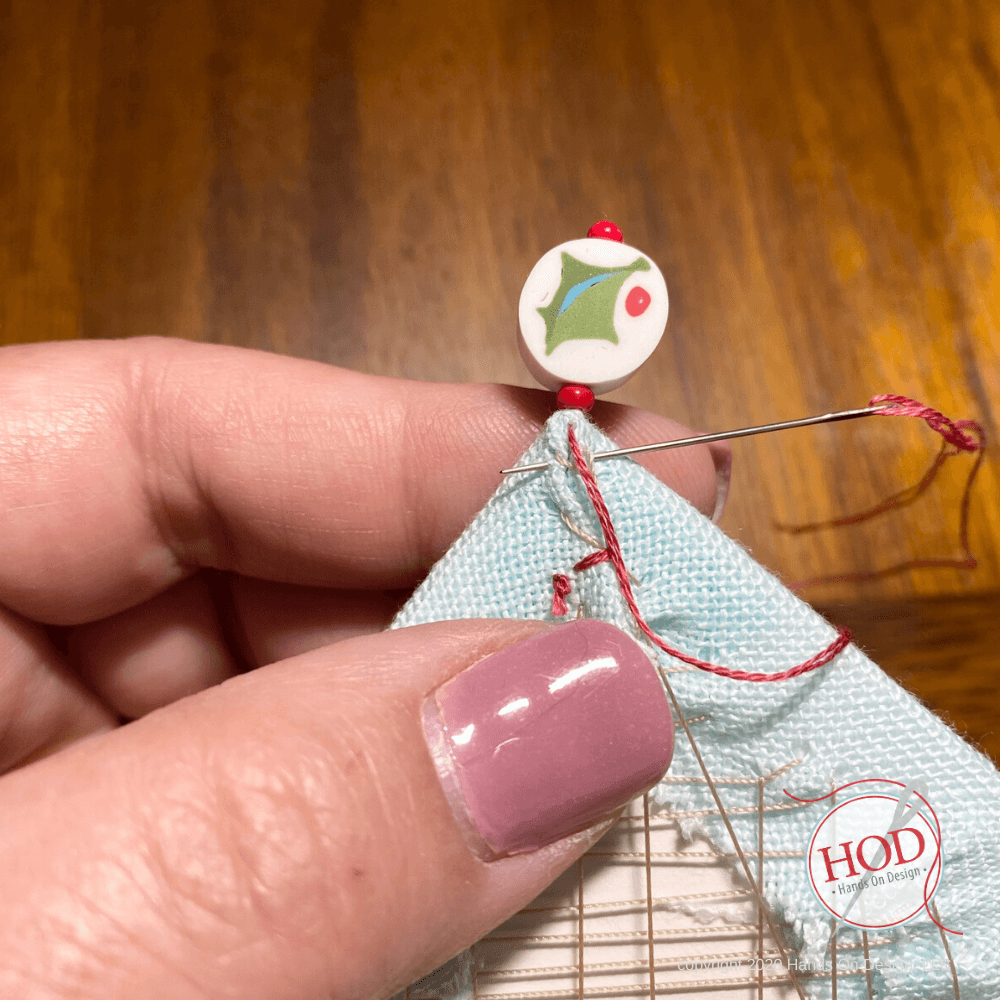
Knot the thread through the linen a few times & trim.

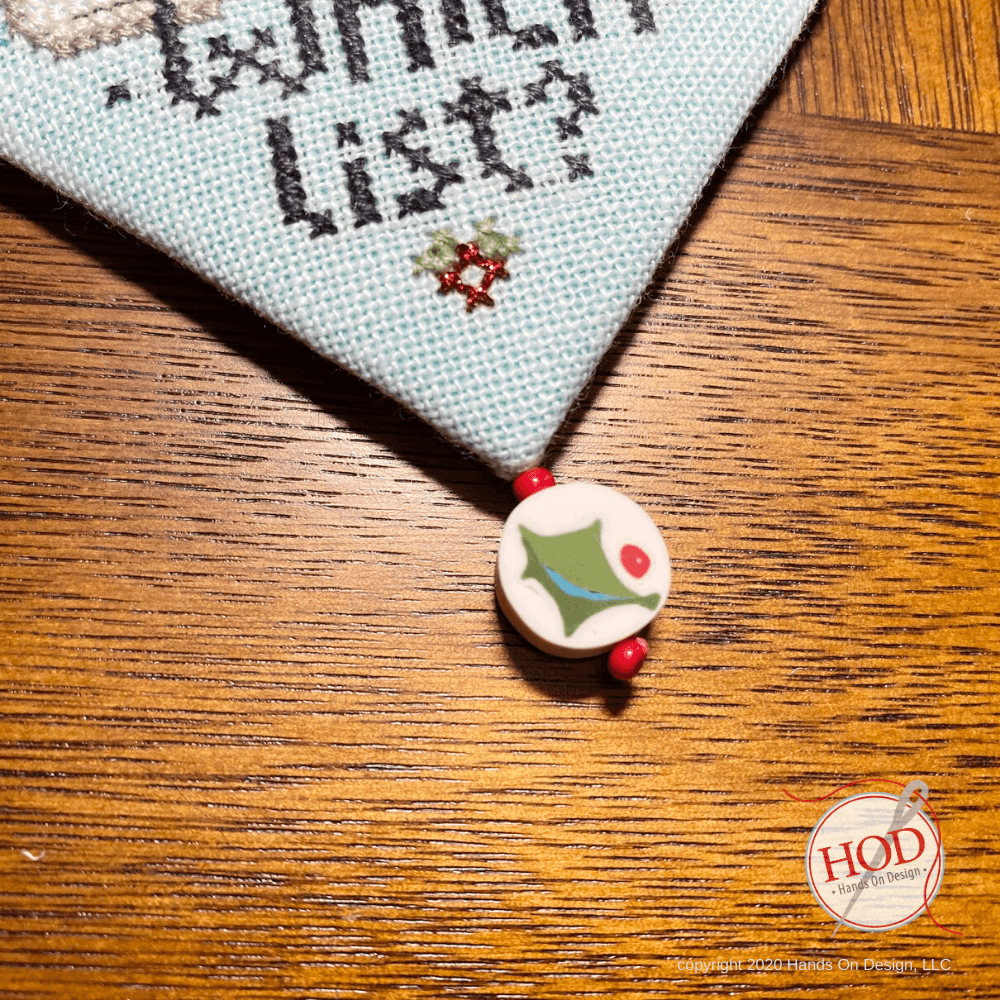
I attached the holly bead to the linen side so that when I laced the front to the back & attached cording, the cording would run behind the bead.

Have fun finishing & be sure to show your finishes using the hashtag — #secretsanta.

Enjoy the stitch,

Cathy, Hands On Design


Filed Under: Tutorials

Like this Post? Subscribe to My Newsletter!

MEANT TO BEE
THANK YOU

Comments

  1. michelle Stephens says

    February 28, 2020 at 2:34 am

    Hi cathy,
    is this pattern released after the Nashville needle market? just found your blog and this post! great website too!
    michelle xx

    Reply
    • Cathy Habermann says

      March 20, 2020 at 8:45 am

      Thank you Michelle – yes, this series kicks off at Nashiville – contact your shop to order the series!

      Reply
  2. Helen K. says

    March 19, 2020 at 10:17 pm

    I heard a rumor that there’s a trick to getting all 9 santas on 1/2 yard of fabric. True? Where can I find the secret to the secret santas?

    Reply
    • Cathy Habermann says

      March 20, 2020 at 8:45 am

      Thank you Michelle – yes, this series kicks off at Nashiville – contact your shop to order the series!

      Reply
    • Cathy Habermann says

      March 20, 2020 at 8:46 am

      Hi Helen – I responded in an email to you – I hope that you received it! -c

      Reply
      • Cheryl Miller Hallmark says

        November 17, 2021 at 11:48 pm

        How can all 9 santas fit on 1/2 yard of fabric? Where can I find the tip for doing so?

        Reply
        • Cathy Habermann says

          November 18, 2021 at 10:50 am

          Cheryl-

          I show in FlossTube episode #35 how to successfully fit all 9 santas onto a fat quarter of fabric – if you fast forward to the last part of the video (once the screen gets a little darker and you see the cut of linen) – that should help you!! – c

          Reply
  3. Amanda Nissen says

    May 1, 2021 at 10:35 am

    What floss did you use to make the cording for the edges?

    Reply
    • Cathy Habermann says

      May 14, 2021 at 2:32 pm

      Amanda- I believe that I used 3811 – it closely matched the linen.
      -c

      Reply
  4. Lauren M Allen says

    October 11, 2021 at 2:18 pm

    What type of cording is used on this design?

    Reply
    • Cathy Habermann says

      October 18, 2021 at 3:06 pm

      I used twisted cord made out of DMC that closely matched the linen color.

      Cathy, HOD

      Reply

Leave a Reply Cancel reply

Your email address will not be published. Required fields are marked *

Shop By Category

Newsletter Subscription

Search

New in the Shop

  • I'M NEW HERE! I'M NEW HERE! $12.00
  • THIS BEE'S GOT KNEES THIS BEE'S GOT KNEES $14.00
  • GOOSE ON THE LOOSE GOOSE ON THE LOOSE $12.00
  • SPRING ROLL SPRING ROLL $12.00

Hands On Design Instagoodness …

hands.on.design

color, design, finish - #stitchsomehappy

The Oh Tomato bellpull tutorial is finally live 🍅 The Oh Tomato bellpull tutorial is finally live 🍅

The tutorial is accessible with the private link inside the chart. 

Designs built on original art 🪡

#handsondesign #ohtomato #originalart #tomaytotomahto #stitchsomehappy
What. A. Day. Thank you to stitchers (from all o What. A. Day. 

Thank you to stitchers (from all over the world) for coming to my finishing class at the Spring Mingle. 

Nothing levels the playing field like watching the designer/teacher struggle with a tiny woolfelt ball 🤣 #youhadtobethere 

Shout out to team @lindystitches for another amazing virtual retreat - the party is NOT over - still so much fun to be had with tomorrow’s classes 

Designs built on original art 🪡

#handsondesign #dodragonsfly #amazingstudents #stitchsomehappy
Pre-stitch kits for 30 Acorns - my in-person class Pre-stitch kits for 30 Acorns - my in-person class at Acorns & Threads are outta’ here!!

They will ship to the shop and then to you!! 

There are just a few seats left in the 2nd session - check out acornsandthreads.com classes 🐿️ 

Designs built on original art 🪡

#handsondesign #acornsandthreads #finishingclass #portland #stitchsomehappy
My first #grwm video - class style!! Can’t wait t My first #grwm video - class style!!

Can’t wait to Mingle with you in class 🪡❤️

Class tickets can still be purchased- head to lindystitches.com to sign up for the Spring Mingle

Designs built on original art🪡

#handsondesign #dodragonsfly #springmingle #stitchsomehappy
Check your email (& spam folder too) - class instr Check your email (& spam folder too) - class instruction email was sent out late this afternoon.

If you didn’t receive it (lost it, deleted it, the dog ate it), please email bill@handsondesign.biz

Please don’t just leave a comment here or send me a DM - quickest way to receive assistance with this is to email Bill!

I can’t wait to see you on Saturday!!! 

Class tickets can still be purchased- head to lindystitches.com to sign up for the Spring Mingle

Designs built on original art🪡

#handsondesign #springmingle2026 #dodragonsfly #finishingclass #stitchsomehappy
Home Sweet Home - Coming Soon! Designs built on o Home Sweet Home - Coming Soon!

Designs built on original art🪡

#handsondesign #homesweethome #comfortstitching #newrelease #stitchsomehappy
Follow on Instagram

Helpful Links

  • My Account
  • Lost Password
  • About
  • Wholesale
  • Store Locator
  • Classes
  • Events
  • OOPSIE

FOLLOW US ON:

Facebook-Logo_For-Website Instagram-Logo_For-Website

Get My Newsletter

And be the first to know about new products, events, tutorials and more!

  • Email
  • Facebook
  • Instagram

Copyright © 2026 · Hands On Design

A Habermann Company · cathy@handsondesign.biz