• My Account
  • Lost Password
  • About
  • Wholesale
  • Store Locator
  • Classes
  • Events
  • OOPSIE

Hands On Design

Needlework and Cross Stitch Designs by Cathy Habermann

  • Shop
  • Tutorials
  • Floss Tube
  • Blog
  • Contact
  • 0 items$0.00

Year In Chalk Finishing Tutorial

June 20, 2016 By Cathy Habermann 4 Comments

Year-In-Chalk-Tutorial-Pic-1

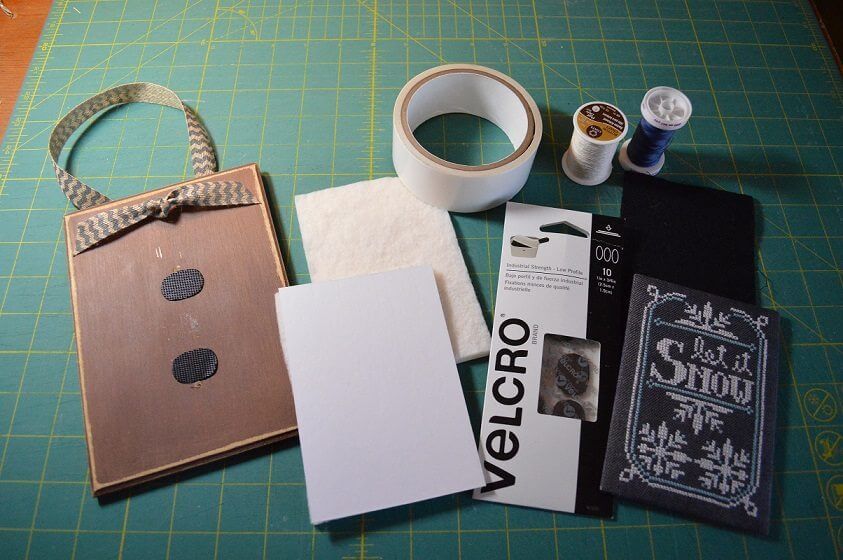
Welcome to A Year in Chalk finishing tutorial. The supplies you will need: stitched piece, finishing board (from your LNS), matboard, cotton batting, stitchery tape (double sided, acid-free), woolfelt or felt, Velcro: Industrial Strength Low Profile sticky back pieces, lacing thread & sewing thread (as well as the usual finishing supplies.)

The full tutorial is shown below but you can also download a PDF here.

Have fun with finishing!
Cathy

Year-In-Chalk-Tutorial-Pic-2

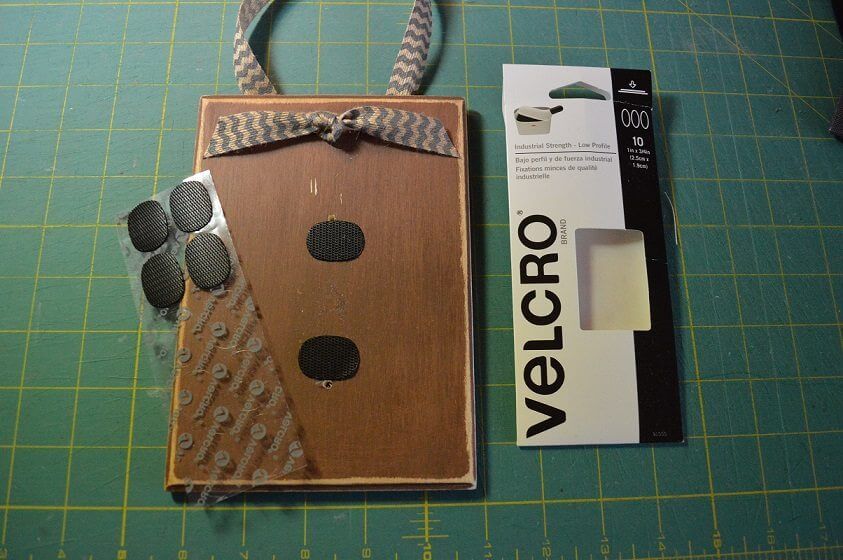
1. Start by placing 2 pieces of the Velcro on the finishing board. I used the “flat” part or the “non-fuzzy” part on the board. You can see my approximate placement. Do not move these around once you have placed them. (They will lose stick-to-it-ness)

Year-In-Chalk-Tutorial-Pic-3

2. Cut a matboard the desired size (save time, cut all 12) 3 5/8”x 5 1/4” if you stitched on the recommended count of linen (30ct). Cut a pice of cotton batting & place on matbord. I liketo keep it in place with a small piece of the stitchery tape. Press & Trim your stitching to approx. 1” from the image.

Year-In-Chalk-Tutorial-Pic-4

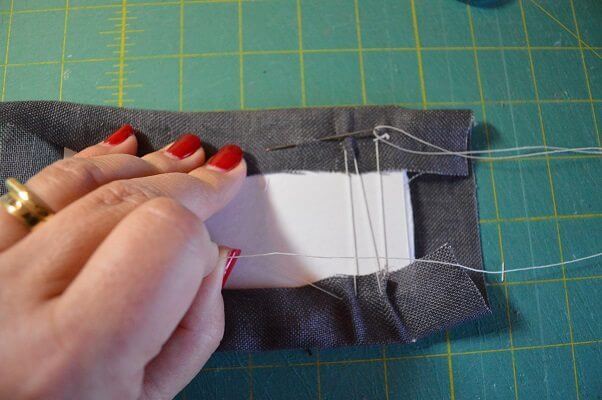
3. Center design on matboard, turn over & begin to lace your stitching. I start with a knot, anchor it, and scoop stitch my way across the long side of the board. Pull evenly across the way & make a small knot at the opposite end to anchor again. Look at the front to check the stitching. Move the linen around as necessary to ensure it is still centered.

Year-In-Chalk-Tutorial-Pic-5

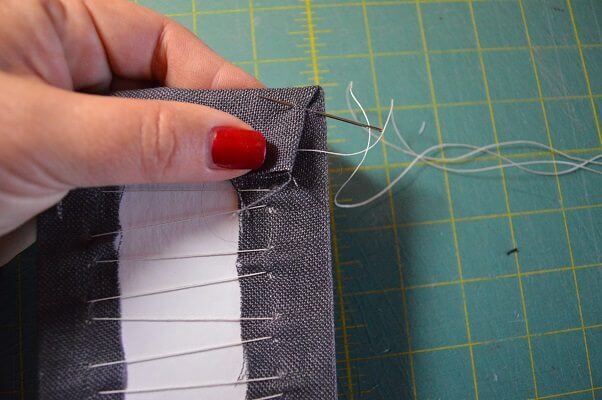
4. Turn the remaining ends in. You may need to trim out some excess linen to avoid thick corners. I find the linen naturally pulls in a bit from lacing the previous side, so I secure my corners with a few stitches to get a crisp looking corner on the front side. Scoop stitch across remaining side.

Year-In-Chalk-Tutorial-Pic-6

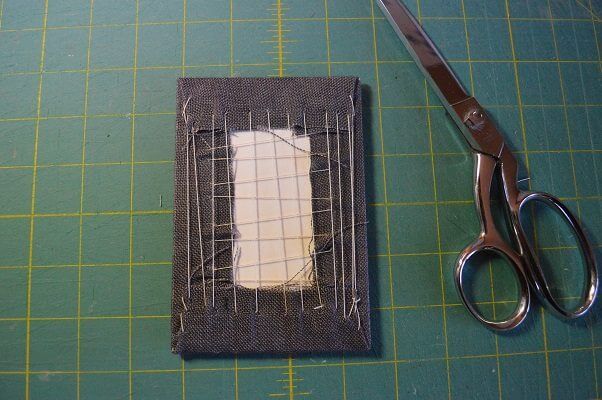
5. The back of your stretched piece looks like this. This is a basic flat finish. From here you can do marvelous finishes, but we go on for your chalkboard finish!

Year-In-Chalk-Tutorial-Pic-7

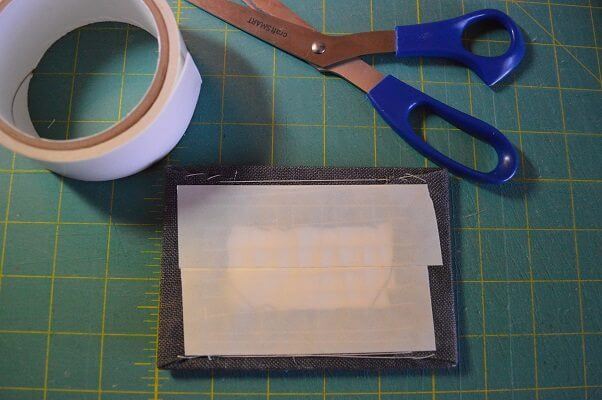
6. You are adhering a piece of woolfelt or felt to the back of your stitching. Note: Yes, you can use sticky back felt if you have some. If not, cut 2 pieces of Stitchery Tape & adhere them to the center of the back. Cut this tape with what I call “sticky scissors”: cheap scissor dedicated solely to cutting sticky tape!

Year-In-Chalk-Tutorial-Pic-8

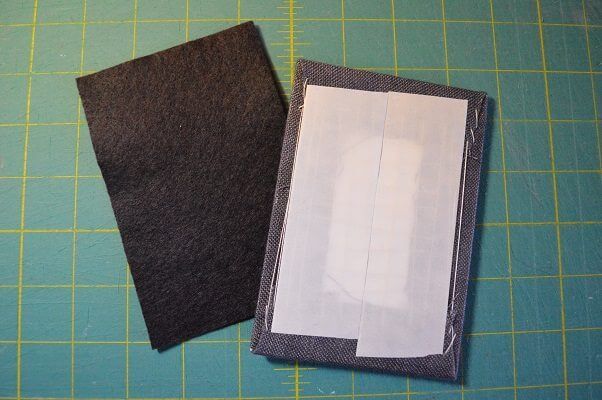
7. Cut your woolfelt or felt to just fit the back of the laced stitching (we don’t want to see the woolfelt from the front view).

Note:  You do need to adhere the middle of the woolfelt. If not, you will pull on it as you change out your months & it will sag a bit. Sagging, even a bit, is never a good thing!

Year-In-Chalk-Tutorial-Pic-9

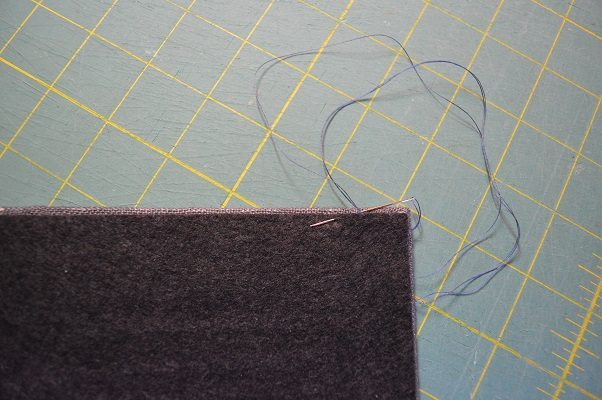
8. Slip-stitch around the woolfelt. This is why I like a non-woven fabric for this project, no-fraying or bits showing on the front. (This step is not needed if you use the sticky back felt.)

Year-In-Chalk-Tutorial-Pic-10

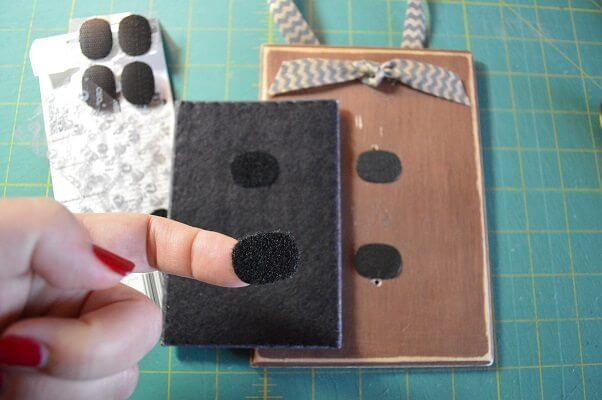
9. Final step! Line up your finished piece on the board and adhere the other side of the Velcro to the woolfelt. It does not need to be exact.

Note:  The package does say “Not for use on fabrics”. Life is about testing the rules, right? We aren’t playing football with these, just changing it out once a month, right? When switching to a new month, carefully slip several fingers under the stitching and ease off the Velcro hold so you don’t bend the flat finish!

Enjoy the Stitch!

Cathy
handsondesign@ymail.com


Finishing Tutorial©2015 Hands On Design & Cathy Habermann. Permission is granted for Shops & Stitchers to print & distribute for classes and personal use. Reposting is permitted with proper reference to http://www.handsondesign.biz These instructions are complimentary & not for resale. Images are the property of Hands On Design & Cathy Habermann.

Filed Under: Tutorials

Like this Post? Subscribe to My Newsletter!

Bloom Bit Fob Finishing Tutorial
Just in case you think I’ve been slackin’…

Comments

  1. SanDee Wake says

    December 1, 2017 at 1:12 pm

    I there a place where I can buy the wooden back for the Year In Chalk designs??

    Reply
    • Cathy Habermann says

      December 6, 2017 at 4:29 pm

      The boards were limited the year we came out with them – we made 1300 of them! I will ask around what shops may still have them in stock & let you know!

      Reply
    • Becca says

      January 23, 2018 at 8:43 pm

      I just bought one at The Fabric Peddler in Wadsworth, Ohio

      Reply
  2. Shirley Gompf says

    May 10, 2020 at 5:11 pm

    My friend doing the year in chalk and I like to leadership get the painless to do them just love the job she doing she live in tx please me know thank you

    Reply

Leave a Reply Cancel reply

Your email address will not be published. Required fields are marked *

Shop By Category

Newsletter Subscription

Search

New in the Shop

  • THAT'S A WRAP - PATRIOTIC COLLECTION THAT'S A WRAP - PATRIOTIC COLLECTION $12.00
  • THREAD, WHITE & BLUE THREAD, WHITE & BLUE $14.00
  • TOES IN THE SAND TOES IN THE SAND $8.00

Hands On Design Instagoodness …

New project stitching, golf tournament fundraiser, New project stitching, golf tournament fundraiser, time to garden, surprise birthday party for a friend (such a surprise that I didn’t take a picture), sunset on the deck. 

I’m ready for the week ahead 🤞🏻 

#handsondesign #lastweekend #summertime #stitchsomehappy
No stitchy posts this weekend- I get to be Mom all No stitchy posts this weekend- I get to be Mom all weekend. Billy just got home from an amazing trip out west where he got to white water raft, ride a gondola, hike in a national park (where they saw all kinds of wildlife), swim, go to a real rodeo, go on an alpine rail, make new friends and so much more. 

I missed him so much (even though he doesn’t live with us every day…yep, the mom in me knew he was far away 😊) - we are so thankful to the Let’s Go West team for planning & documenting this trip. He’s staying on with us a few more days …I was even excited to do his laundry!?!?🤷🏻‍♀️🤦🏻‍♀️

#handsondesign #chickinthenest #stitchsomehappy
Are you in the mood for more BAP - Big Awesome Pro Are you in the mood for more BAP - Big Awesome Produce??

The follow up to 'There's a Hare in my Garden' will debut in September & I can't wait for you to see it!!

#handsondesign #bigawesomeproduce #fabricsbystephanie #pearlcotton #stitchsomehappy
The Finishing Touch Course-in-a-box is open for pr The Finishing Touch Course-in-a-box is open for pre-order only through July 31st! They will not be available after that date.

Pre-order means, if you place an order, you will receive yours (orders are fulfilled in the order they are received starting Aug 1st)

Head to chantelles141.com to read what all is included in your shipment & get your fabric & floss list while you are there 

#handsondesign #thefinishingtouch #courseinabox #homesweethome #stitchsomehappy
It's World Emoji Day!! 🌼🤷🏼‍♀️🍅🪡😉❤️ 

Did you know that when I released Well Hello There - we called those adorable buttons that grace each stitch every month 'button-moji's'?? 

Button-moji packs are still available from my dear friends @justanotherbuttoncompany - I don't know that button-moji ever caught on as a word but they sure look cute

#handsondesign #wellhellothere #EmojiFun #justanotherbuttoncompany #stitchsomehappy
A little 'down-time' between HOD models, I started A little 'down-time' between HOD models, I started Harvest Lilies from my good friend Tracy @inkcircles.xs - I switched up the linen for 32ct Rosewood @fabrics.by.steph & called for threads with Sulky 12wt. I do have a yellow pulled for the negative space that looks kinda quilty. I'm thinking about leaving it like it is...what do you think?

#handsondesign #harvestlillies #eveningstitching #stitchsomehappy
Join Me on Instagram

Helpful Links

  • My Account
  • Lost Password
  • About
  • Wholesale
  • Store Locator
  • Classes
  • Events
  • OOPSIE

FOLLOW US ON:

Facebook-Logo_For-Website Instagram-Logo_For-Website

Get My Newsletter

And be the first to know about new products, events, tutorials and more!

  • Email
  • Facebook
  • Instagram

Copyright © 2025 · Hands On Design

A Habermann Company · cathy@handsondesign.biz