• My Account
  • Lost Password
  • About
  • Wholesale
  • Store Locator
  • Classes
  • Events
  • OOPSIE

Hands On Design

Needlework and Cross Stitch Designs by Cathy Habermann

  • Shop
  • Tutorials
  • Floss Tube
  • Blog
  • Contact
  • 0 items$0.00

Flat Finish Tutorial

May 26, 2016 By Cathy Habermann 3 Comments

Flat-Finish-Tutorial-Image-1

Flat finishing is the fundamental finish for the [square·ology] series…so we are THRILLED to share a cross stitch finishing tutorial for the flat finish today!

Once you’ve mastered this technique, you can move on to our other complimentary finishing tutorials!

Everyone send a big THANK YOU to Cathy Habermann for writing and photographing the instructions for this tutorial. Cathy(Hands On Design) is an expert finisher AND one of the designers of [square·ology]!

The full cross stitch finishing tutorial is shown below, but you can also download the PDF Flat-finish tutorial.

Happy Finishing!

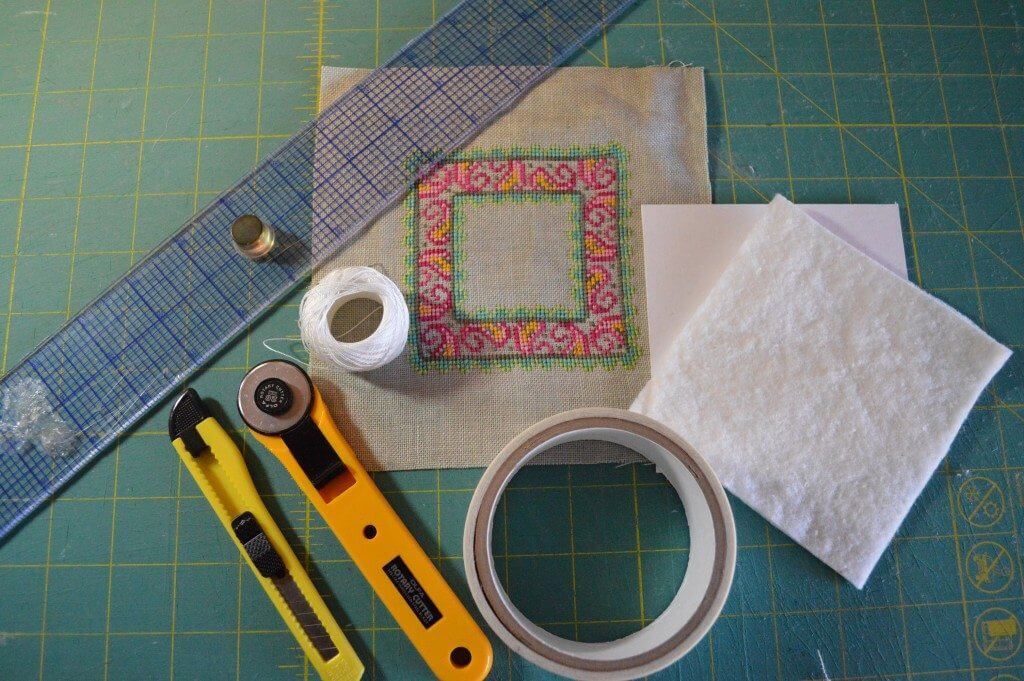
Materials & Supplies

[square.ology] stitched piece

matboard

cotton batting

Stitchery tape (double-sided acid free)

Lacing thread (pearl cotton #8

or hand quilting thread)

Sharp needles

Rotary cutter

Quilter’s ruler

Cutting mat

Box cutter

Iron & pressing surface

Flat-Finish-Tutorial-Image-1

Measure and cut on your cutting mat:

  • With the box cutter, cut the matboard to the desired size (4 3/8”square for 4” designs, 2 1/2” square for 2” designs).
  • With the rotary cutter and quilter’s ruler, cut a matching piece of cotton batting . Cut a second smaller piece of batting if you would like a more cushioned look. Attach the first layer of batting to the matboard piece with double sided tape, lining up the cut edges.  Center the optional second piece of batting on top.
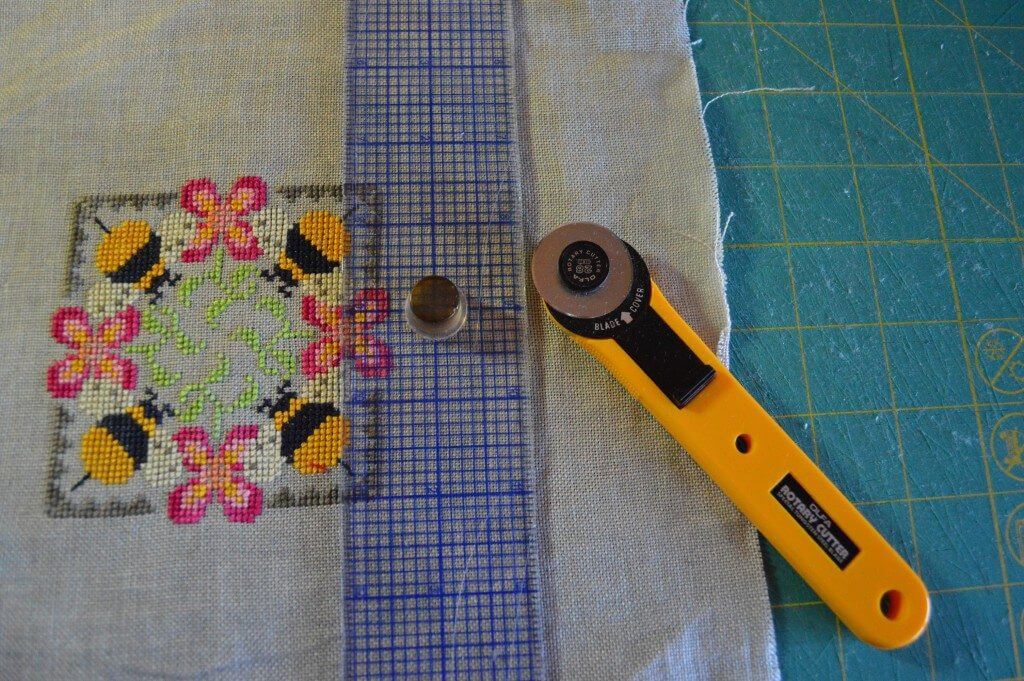
  • Press, then trim your stitched piece approximately 1 1/2” away from the stitched image of a 4” design using the rotary cutter and quilter’s ruler. Leave just 1” of linen around a 2” design.
Flat-Finish-Tutorial-Image-2

Lace the needlework

  • Thread your needle with a long length of strong thread. Knot the thread near the end.
  • Center your stitching over the batting side of the matboard. Place face down on your work surface and begin to lace.
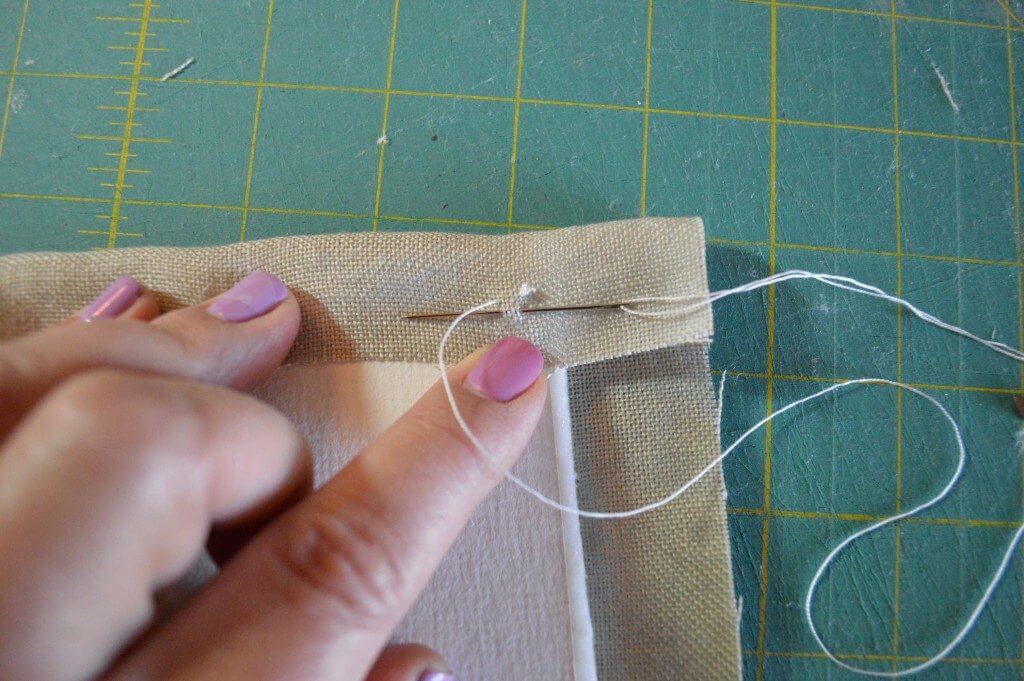
  • Fold the upper edge of linen down over the matboard. Anchor a knot in the top right corner of the linen at the edge of the matboard.
  • Secure the first stitch by running the needle in a scooped motion through the linen (needle in and out of linen parallel to the edge of the linen—a scoop is less than 1/4”). Scoop it through again close to the first scoop. Pull the thread tight.  Now your knot will not pull out.
Flat-Finish-Tutorial-Image-3

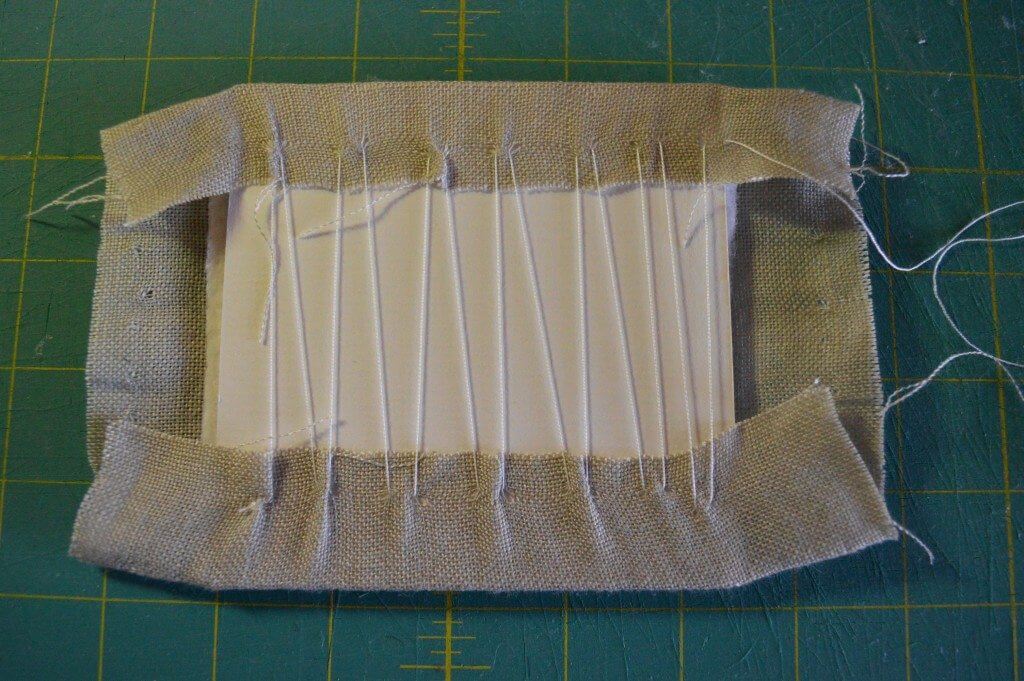
  • Scoop stitch your way across the board, first on the lower linen edge folded up over the matboard, then back up to the top edge—about 1/2” between two scoops. Be careful to pull firmly, but not too tight so as to distort the linen. Knot at the far end.
Flat-Finish-Tutorial-Image-4

  • Turn the piece over to the front to make sure that the design is still centered. Move linen around to make any adjustments.
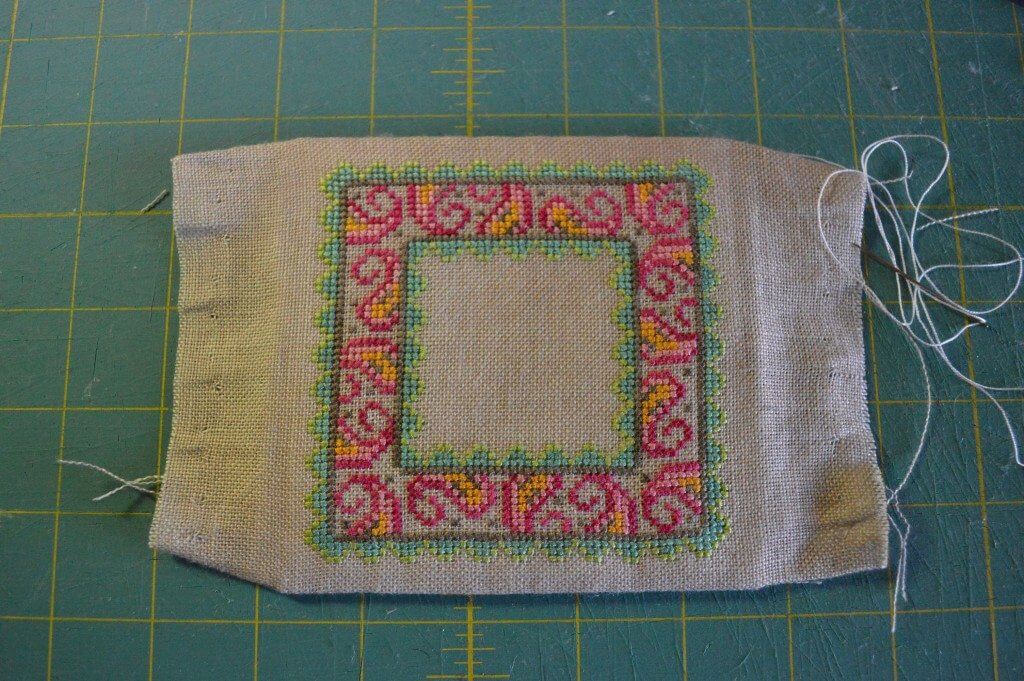
Flat-Finish-Tutorial-Image-5

  • Fold the two remaining edges of linen toward the back. You may need to trim away some of the excess corner linen if it appears too bulky. If so, cut away linen from the corner only—and don’t cut any closer than 1/2” from the matboard edge or the cut may pull around to the front.  The linen tends to angle in at the corners as you fold it.  Tuck it in a little as if you are wrapping a package so than the end of the folded edge is at least 1/4” in from the edge of the matboard.  This keeps the edge smooth and neat from the front if you are top-mounting the finished piece.
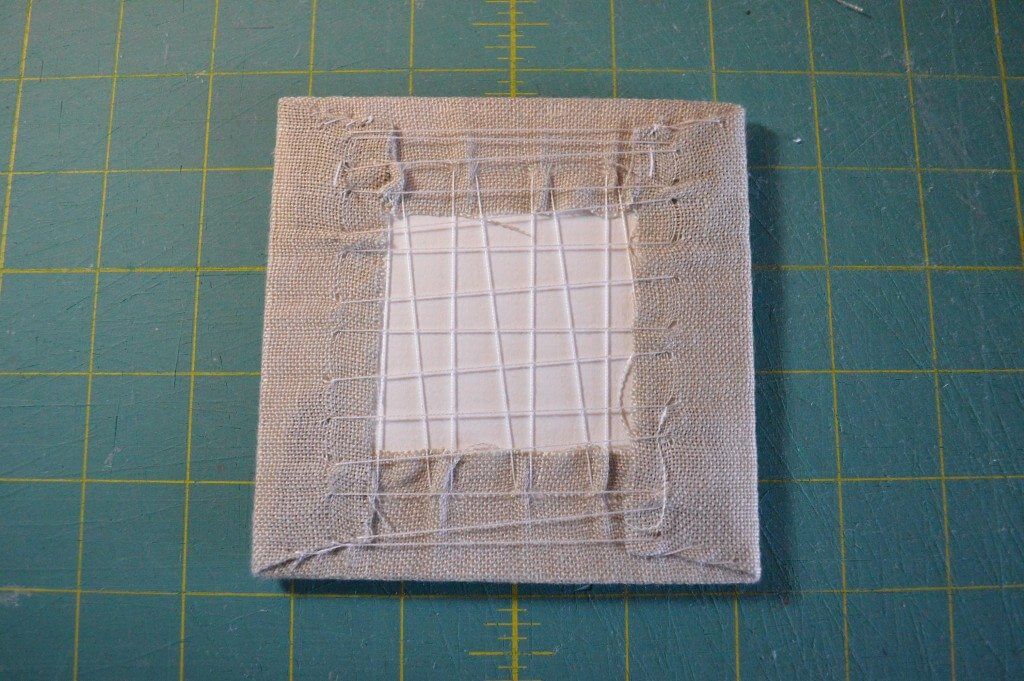
Flat-Finish-Tutorial-Image-6

  • Scoop stitch back and forth to lace the two new folded sides. Sew the angled edges of the new folded sides to the sides already laced.  Knot off and run your needle through the linen about 1” away from knot and toward the center of the piece before clipping the thread.  This helps keep the thread tail from showing on the front of your work.
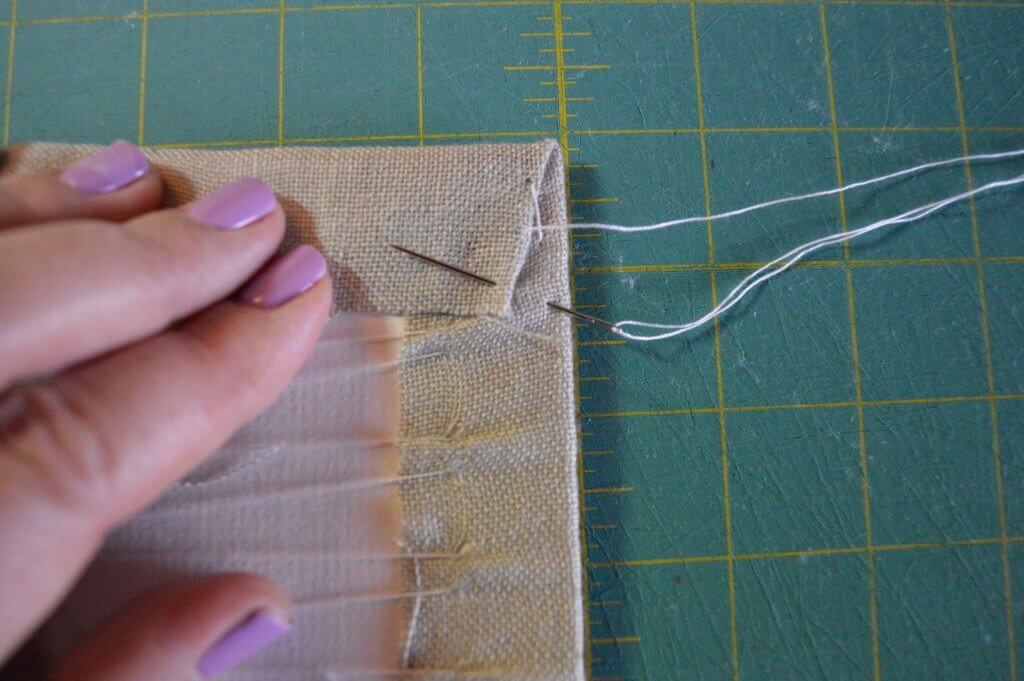
Flat-Finish-Tutorial-Image-7

  • You are ready to flat-finish all of your [square.ology] stitching—to mount with double-sided stitchery tape on all sorts of fun boxes, frames, fobs and wall-hangings!   Show us what you create!
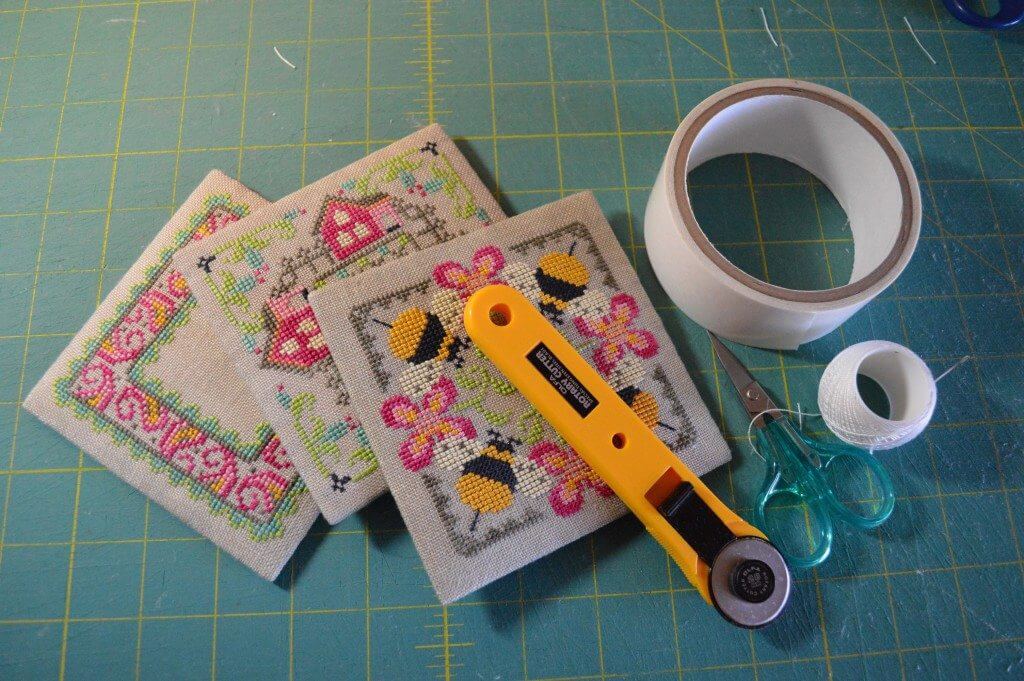
Flat-Finish-Tutorial-Image-8


©2015, Hands On Design, Just Another Button Company™    No permission is granted to reproduce these instructions or images for commercial purposes, although shops may distribute the instruction sheet as part of a class or tutorial featuring [square.ology] or other products by Hands On Design or Just Another Button Company.  Permission for other uses must be granted individually and in writing.  The instructions and images may not be published or shared electronically by shops or individuals. Instructions and images are property of Hands On Design and Just Another Button Company.


Filed Under: Tutorials

Like this Post? Subscribe to My Newsletter!

Block Party Tutorial
Ahoy Frame Finishing Tutorial

Comments

  1. Tammy Sue Bunge says

    November 18, 2017 at 10:31 pm

    What is a mat board? Foam CORE…Sticky back board3?? Thank you SO MUCH Tammy Bunge

    Reply
    • Cathy Habermann says

      November 30, 2017 at 7:32 pm

      Mat board is what framers use to mat around your framed piece. It comes in many colors, but for our purposes, I use white. It’s about 1/16″ thick and can be cut with a box cutter. I buy mine from hobby stores in large sheets. I use it in place of mat board when I don’t want my finishes to be that thick. I do not use sticky board. Cathy

      Reply
  2. Laura Miller says

    June 27, 2020 at 3:59 pm

    I just came across your finish and I have been doing the lizzie Kate monthly and seasonal designs for years and these were in my SNAF pile. I tried a hot glue method because your stitching the linen to the back intimidated me. I tried this method on the second one that I finished and it turned out so much better. My linen is always wonky and crooked. Still is but this method is easy and fun.

    Putting these together to display on my desk at school. Will change them out monthly. I also made the clipboard and it turned out so cute. Will definitely be looking at all your fun finishes!!

    Thank you so much for sharing your creative ways!

    Reply

Leave a Reply Cancel reply

Your email address will not be published. Required fields are marked *

Shop By Category

Newsletter Subscription

Search

New in the Shop

  • A B SEA A B SEA $8.00
  • MADE IN THE SHADE MADE IN THE SHADE $8.00
  • HEY SAM HEY SAM $8.00
  • HOME SWEET HOME HOME SWEET HOME $14.00

Hands On Design Instagoodness …

hands.on.design

color, design, finish - #stitchsomehappy

The Quilted Gingers, stitched with care, Little s The Quilted Gingers, stitched with care,

Little sweet cottages everywhere.

With sugared roofs and patchwork flair,

They warm the season with homespun air.

Here’s your 1st Sneak Peek at the next Collection in the Hands On Design Ornament Club on Patreon - The Quilted Gingers!

Check out my link in profile for Patreon info. New Collection drops in July❤️

Designs built on my original art 🪡

#handsondesign #ornamentcollection #patreon #originaldesign #stitchsomehappy
Our final stop on the Tri-State Shop Hop did NOT d Our final stop on the Tri-State Shop Hop did NOT disappoint!! So many wonderful stitchers came. 

This morning was spent at Stitchery Nook in Osage, IA - I love when stitchers share their HOD finishes ❤️❤️

Off to Hayden’s house before we head for home!

Travel to each of the participating shops June 1-August 31 & collect all 3 parts of this sampler. 

Shanty Stitchers, Beresford SD
Welcome Stitchery, Blue Earth MN
Stitchery Nook, Osage IA

Yes, you will be able to ‘collect’ this chart even if you can’t travel there. (Starting Sept 1)

Designs built on my original art 🪡

#handsondesign #
What a blast at Welcome Stitchery! Justine and her What a blast at Welcome Stitchery! Justine and her whole crew were so welcoming…it’s just what they do!❤️

We head back to IA tonight to do it all over again tomorrow- btw, a very dedicated stitcher drive from SC to hit the hop!! 🤩 

Travel to each of the participating shops June 1-August 31 & collect all 3 parts of this sampler. 

Shanty Stitchers, Beresford SD
Welcome Stitchery, Blue Earth MN
Stitchery Nook, Osage IA

Yes, you will be able to ‘collect’ this chart even if you can’t travel there. (Starting Sept 1)

Designs built on my original art 🪡

#handsondesign #redwhiteblue #blueearth #shophop #stitchsomehappy
So much fun at Shanty Stitchers this morning. We h So much fun at Shanty Stitchers this morning. We had visitors come from ALL over! Even a few surprise visitors (never underestimate the power of a girl’s weekend)❤️

On to the next stop!

Travel to each of the participating shops June 1-August 31 & collect all 3 parts of this sampler. 

Shanty Stitchers, Beresford SD
Welcome Stitchery, Blue Earth MN
Stitchery Nook, Osage IA

Yes, you will be able to ‘collect’ this chart even if you can’t travel there. (Starting Sept 1)

Designs built on my original art 🪡

#handsondesign #shophop #redwhiteblue #stitchsomehappy
Singing to reach the folks in the back…we’re going Singing to reach the folks in the back…we’re going on the road!!

I’ll be posting and storying along the way😎❤️

See you soon?

Red. White. Blue. is the official pattern of this summer’s Tri-state Shop Hop.

Travel to each of the participating shops June 1-August 31 & collect all 3 parts of this sampler. 

Shanty Stitchers, Beresford SD
Welcome Stitchery, Blue Earth MN
Stitchery Nook, Osage IA

Yes, you will be able to ‘collect’ this chart even if you can’t travel there. (Starting Sept 1)

Designs built on my original art 🪡

#handsondesign #roadtrip #shophop #redwhiteblue #stitchsomehappy
Red. White. Blue. is the official pattern of this Red. White. Blue. is the official pattern of this summer’s Tri-state Shop Hop.

Travel to each of the participating shops June 1-August 31 & collect all 3 parts of this sampler. 

Shanty Stitchers, Beresford SD
Welcome Stitchery, Blue Earth MN
Stitchery Nook, Osage IA

Yes, you will be able to ‘collect’ this chart even if you can’t travel there. (Starting Sept 1)

Designs built on my original art 🪡

#handsondesign ##redwhiteblue #shophop #stitchsomehappy
Follow on Instagram

Helpful Links

  • My Account
  • Lost Password
  • About
  • Wholesale
  • Store Locator
  • Classes
  • Events
  • OOPSIE

FOLLOW US ON:

Facebook-Logo_For-Website Instagram-Logo_For-Website

Get My Newsletter

And be the first to know about new products, events, tutorials and more!

  • Email
  • Facebook
  • Instagram

Copyright © 2026 · Hands On Design

A Habermann Company · cathy@handsondesign.biz